Install Android M Developer Preview FreeXperia ROM on Xperia Z1
Thanks to the hard work of FreeXperia team, it seems that Xperia owners can finally enjoy the Android M preview experience via custom ROM, even if the official release is months away.
To be more precise, the FreeXperia team has released its custom builds compiled from the original Android M Developer Preview source code (now compatible with Sony Xperia Z1) with the binaries Sony announced for the preview version and I know that you are tempted of giving it a try, but keep in mind that this is a developer preview where bugs can be a problem.
In case you are curious to know what features are coming with the official version of Android M, you can go ahead and give it a try by installing FreeXperia ROM on your own Sony Xperia Z1. All you need is to have a rooted phone with a custom recovery installed and with the bootloader unlocked. Even more, you will have to make a wipe of the system as long as the data which is stored on your device will be erased.
If you choose to apply this tutorial, the warranty of your Xperia Z1 will get void; however, it can be restored, but only if you want to downgrade to the stock ROM, or by updating to the official version of the Android platform – you can find more details about this procedure on this guide on How to Restore the Warranty on your Android device.
How to Enjoy Android M Developer Preview FreeXperia ROM on Xperia Z1:
- Take the Android M Developer Preview from this link;
- Also take Gapps from here;
- Connect the Xperia Z1 to the PC using the USB cable;
- Transfer the downloaded files to the phone’s internal storage or and remember the location;
- Disconnect the USB cable from the phone;
- Up next, switch it off;
- Enter into recovery mode, so start pressing Volume Up and Power buttons together;
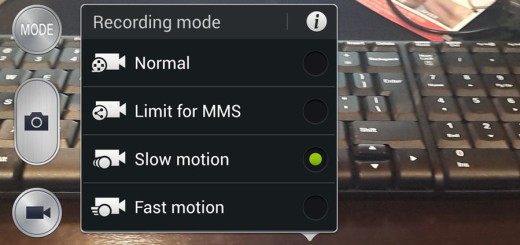
- In the recovery mode, select a full data wipe by choosing wipe data/factory reset;
- Then, also perform a cache wipe by selecting wipe cache partition;
- Perform a wipe of dalvik cache by selecting advanced then wipe dalvik cache – this is optional, but it helps preventing any other errors;
- Return to the main menu of the recovery mode and select ‘install zip from SD card’;
- Go to the ROM zip file, which you copied before and install it;
- Do the same for the Google Apps;
- Then, return to main menu of recovery mode;
- At the end, reboot the hansdet by selecting ‘reboot system now’.
Starting to this moment, your Sony Xperia Z1 should be running the Android M ROM by FreeXperia. Have you been successful? Don’t forget to share your experience or any problem that you might have encountered in the comments area from below.
Also read: