
Learn How to Flash Android M on Sony Xperia T3
Here I am, with a new tutorial for all Sony Xperia T3 owners! Your smartphone is also included in the list of Sony Xperia devices which are compatible with FreeXperia ROM, so you can flash and enjoy Android M before its official launch.
You are going to complete an unofficial operation, so understand from the start that unexpected things might happen during the procedure and that you will void the Xperia T3 warranty while updating to Android M firmware. However, you can learn how to restore it and solve this problem, but this still has to mean that you must pay attention and make no mistake as you are the only one responsible for your phone.
For the start, you have to unlock the phone’s bootloader, root it and install CWM or TWRP Custom Recovery. Do not start the procedure without applying a proper backup. As I said, this is an unofficial process, so back up your precious data including contacts, call logs, text messages, internet settings, images, videos, audio files, market apps, IMEI / NVRAM and everything else that you might have saved on your Xperia T3.
Read: How to Backup and Restore IMEI / NVRAM Data on Android Devices
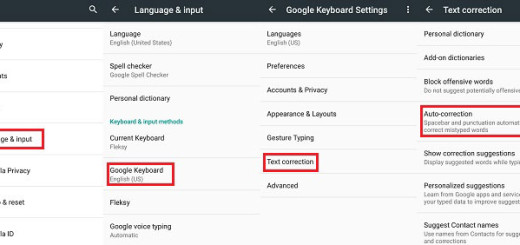
Even more, on your Sony Xperia T3, before installing Android M custom ROM, I recommend enabling the USB debugging feature. You can do that by entering into Menu – Settings – About phone and tapping no less than seven times on built number until developer options are being ensured; then, go to Menu – Settings – Developer options and check the USB debugging checkbox. And yes, you should definitely plug in the charger if the battery power is currently lower than 60%.
The Installation of this Android M Developer Preview is also possible only if you can use a computer and you have the original USB cable and if you have installed USB drivers on the computer, or else your Xperia T3 smartphone will not be recognized.
Learn How to Flash Android M on Sony Xperia T3:
- For the start, download the Android M Developer Preview file from here;
- Up next, you must take Google Apps by accessing this direct link;
- It’s time to connect your Sony Xperia T3 to the computer via USB cable;
- Then, transfer the Android M Developer Preview zip file and the Google Apps one into the root folder of the handset’s SD card memory;
- Disconnect from the computer;
- Then, turn off the device;
- Turn the phone on while pressing Volume Up and Power buttons together at the same time
- After entering the Recovery mode, clear select ‘wipe data/factory reset’;
- Then, also clear the cache memory by selecting ‘wipe cache partition’;
- Select ‘advanced’ and tap ‘wipe dalvik cache’.
- From the main recovery, you have to install the Android M Developer Preview from SD card;
- Then, you have to follow the same path for Google Apps;
- Once done with the installation process, just choose ‘reboot system now’ and that was all.
The first boot takes 5-10 minutes, so there is no reason to be worried. If after 10 minutes you are in the same situation, think about clearing the dalvik cache once more to solve the problem.


blocked url .. for android m
T3 D5102 compatible???