
How to Flash TWRP Recovery on YU Yunique YU4711
With the help of the TWRP recovery software, you can take Nandroid backups, install the latest custom ROMS as well as flash available modified kernels and more. Is this something that you have in mind for your YU Yunique YU4711? Well, thanks to Anuragdc, a developer at XDA, you can do that! He managed to compile the TWRP custom recovery image for the mentioned Android based device and now owners can start modifying their system with no problems.
However, note that an unlocked bootloader is required on your YU Yunique in order to install a custom recovery like TWRP and you must also set up ADB and Fastboot on your computer. For that, take the full Android SDK from here.
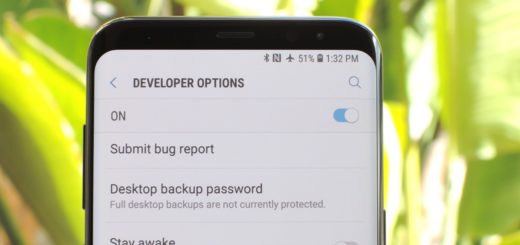
Do you also have USB debugging enabled on your phone? For this, you must go to Settings > About phone and then, tap ‘Build number’ 7 times. Go back to Settings, then choose the now visible ‘Developer options’. Find the ‘USB debugging’ option and use its toggle button to enable it.
Up next, simply accept warning by tapping on OK button. Even though this operation doesn’t wipe your YU Yunique data, my advice remains unchanged: you should take a backup anyway. So, once you install a custom recovery like TWRP, you can choose the backup option from the recovery as a measure of precaution in case anything goes wrong.
And no less important, the following guide is made to root YU Yunique YU4711 devices only. Do not apply the below steps and the provided files on another handset or you will likely brick that device. If this happens, note that you are the only one responsible for such a thing, so be prepared to face such possible consequences.
How to Flash TWRP Recovery on YU Yunique YU4711:
- First of all, you need to download the recovery image file be entering here;
- Then, ransfer the file to your PC where you can easily locate it;
- Make sure you have setup ADB and fastboot on your PC. Also accept Always allow from this computer when you plug in the device for first time to enable USB Debugging;
- Now, power off your device and unplug it from your PC;
- Get the device in bootloader mode by pressing the Volume Down and Power buttons until you can see the bootloader mode text on the display;
- Go to the recovery file and rename it to recovery.img;
- Right-click the mouse where there are no files to bring up a new menu;
- Select “Open command window here” option to launch a cmd window;
- Type the command from above to check your device connectivity:
fastboot devices - Flash the custom recovery by issuing this command:
fastboot flash recovery recovery.img - Boot your phone in recovery mode. You can do this by turning your device off and then press and hold volume down and power keys at the same time;
- There you can choose to back up your current ROM, data, EFS and now there is nothing stopping you from enjoying the changes.
If you encounter any difficulty, feel free to let me know via the comment section or the contact form.


can some one upload a backup img of yunique 1477 i have a bricked phone .. please help