How to Solve Startup Problem on Nexus 6P
Google has started to roll out the Android N OTA update for Nexus owners who applied to the Android Beta Program, but this is not a reason of joy for all users. I am saying that as long as many of them experience serius startup problems on their devices and it seems that Nexus 6P owners are no exception.
Is your Google Nexus 6P not booting up too? If you are looking for the causes as to why your phone won’t turn on properly, you know that there is a long list of potential hardware, software, or even firmware errors. In any case, you don’t have to sit there and wait for a miracle to happen, but it’s time to take action on your own.
Sideloading the Android N OTA update on Nexus 6P is the key in this case, but for that to possible, you must be prepared.
To be more precise, you have to make sure you have a working ADB on your computer, that the proper USB drivers are also installed on the computer and don’t forget that you must use a power source and an USB cable that you know for sure they work. If a damaged charging cord is used, the device may stop working for good and this is the last thing that you need.
How to Solve Startup Problem on Nexus 6P:
- For the start, enter here and take the Android N OTA update zip file;
- Change the downloaded zip’s file name to ‘update.zip’;
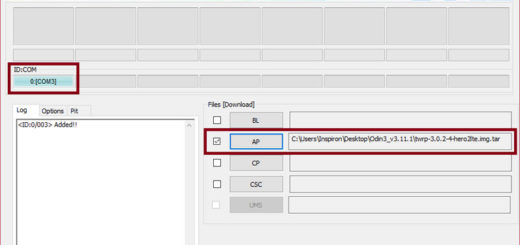
- Now, you should move the file in the ADB installation directory that can be found in C -> Users ->User – ADB;
- Turn off your Nexus 6P phone;
- Up next, you have to boot it into Recovery mode by holding down the Power and Volume down buttons at the same time; don’t hesitate to choose ‘Recovery mode’, confirm your action with the help of the Power button and when the exclamation mark appears, press the Power button, followed by the Volume down or up button;
- Up next, just choose the ‘Wipe data/factory reset’ option for a clean start;
- Now, you can finally select ‘Apply update from ADB’ in recovery;
- Establish a connection between your handset and the laptop via the USB cord;
- Go to the ADB folder and launch a command prompt window there by pressing the Shift key, right clicking and selection the ‘open command prompt window here’ option;
- In the command prompt, enter the regular command: adb devices;
- Wait for all the files to be installed;
- Then, reboot the phone by selecting ‘Reboot system now’;
- If your device is listed, enter this command in the command prompt: adb sideload update.zip;
- Then, press the Enter key;
- All the files will be installed and only at the end you’ll have the chance to reboot the phone.
If you find the information in this tutorial helpful, then use the comments section below, the contact form or share it through Google +, Facebook, Twitter. Like that, you cam help others solve the same issue on their handsets too!