How to Set SD cards as Internal ‘Adoptable’ Storage on Galaxy S7
Samsung made a mistake by removing the microSD support from the Galaxy S6 and now it’s making things right. How? By simply adding expandable storage to the Galaxy S7. The microSD slot gives you the chance to add up no less than 200GB of extra storage to your handset, but that’s not necessarily great news.
You know that one of Android Marshmallow’s amazing features is the ability to ‘merge’ the Micro SD card with the internal storage. This allows the phone to treat the resulting memory as a single partition, making it easier to see how much storage you have available. However, Samsung decided it wouldn’t be supporting this feature with the Galaxy S7, but who says that Samsung’s decision to keep you way from the adoptable memory should be the final one?
Let me assure you that a few steps are standing away between your current position and the one setting SD cards as Internal ‘Adoptable’ Storage on the handset that you own. After all, this is what Android Marshmallow is about!
Someone discovered how to enable the feature on any Galaxy S7 device, without having to root it or complicate in any way. For that to be possible, enable USB debugging on the Galaxy S7, so tap five times on the build number of the Galaxy S7 in the developer Settings area. Go to System > About phone and tap five times on the phone’s build number. This will enable developer mode. You can finally go to Settings > System > Developer options and enable USB debugging.
You must also manage your storage, so if you have a high-capacity microSD card, you have to decide how much of it you want to allocate to Adoptable Storage. You should know the Adoptable Storage part isn’t accessible on a computer, so if you want to use a microSD to move data to and from a computer, you still need some of the conventional SD storage on the card.
And before starting the actual guide, don’t forget to back up anything on your SD card as it will be formatted in the process.
How to Set SD cards as Internal ‘Adoptable’ Storage on Galaxy S7:
- Download the Android SDK onto your computer via this link;
- Install it;
- Now, you have to connect your S7 to the computer with the help of the original USB cord;
- Open the command prompt on your computer;
- Type ‘adb shell’;
- After that, type in ‘sm list-disks’ to bring up the disk ID of your SD card;
- With the disk ID you can adopt the MicroSD card as storage by typing ‘sm partition disk:[enter your disk ID here] private’;
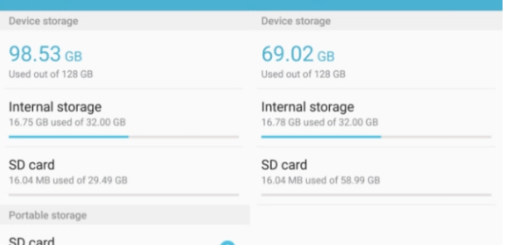
- Then, go to Settings > Storage;
- At this point you will see all the storage lumped together as one, instead of the separate SD card option that you were used to find. Enjoy!
For those whom I’ve helped with this guide and others, don’t keep it to yourself! Spread the word by sharing our posts or by liking our Facebook and Google+ pages.