Solve “Unfortunately, the process com.android.phone has stopped” Galaxy S7 Edge Error
Here you are looking for a solution for the “Unfortunately, the process com.android.phone has stopped” Galaxy S7 Edge error! I bet that you are wondering if this is only happening to you and the truth is that the problem was encountered long ago even in Samsung Galaxy S2, S3 and many other Android-based device models.
Now, it’s back even on a handset such as yours and many owners complain about continuously receiving this when they try to receive a call, some even claim that their beloved smartphone started rebooting automatically and many more.
In any case, the error message that you are receiving is triggered by the phone or SIM toolkit application. So, if you are constantly getting the “Unfortunately the process.com.android.phone has stopped” error, then there are actually a couple of ways to fix it, so don’t waste any more time:
Solve “Unfortunately, the process com.android.phone has stopped” Galaxy S7 Edge Error:
- First of all, I would recommend you trying to reset the Phone App on your Galaxy S7 Edge. For that, you should:
- Enter into Settings;
- Search there for Application Manager and tap on it;
- In the Application Manager itself, switch to the tab All;
- After that, search for Telephone and tap on it to open the app information;
- Now, you must tap in the following order the buttons within the app-info: Force stop, Clear data and Clear cache;
- Then, you must restart the handset. The error Unfortunately the process com.android.phone has stopped should now not appear anymore, but if it’s still there, move on to the next step;
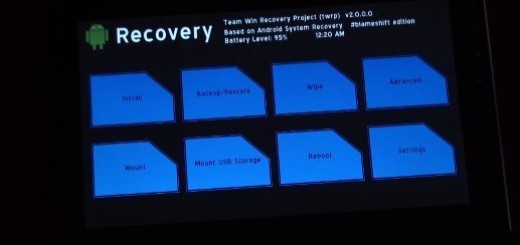
- Wipe the cache partition on your Galaxy S7 Edge. Let me remind you that as long as cache partition is separated from your data and files in the storage, it is perfectly safe for your data and settings when you perform this procedure. Here are the steps that you must follow:
- Reboot your Galaxy S7 into recovery mode;
- In Galaxy S7 recovery mode, you can use Volume up and Volume down buttons to navigate through entries, as well as the power button to select the entry;
- By using the Volume down (and up) button, go to the Wipe cache partition;
- Then press power button to select it;
- After pressing power button in recovery menu page, you will then be asked to confirm the selection and operation;
- You need to use the Volume down button to navigate to Yes, then press the Power button to confirm that you want to clear Galaxy S7 cache partition;
- Once Galaxy S7 finishes to wipe cache partition, you can reboot the phone.
- If you are here, than nothing else worked, so give a try to hard resetting the device. This is usually your last resort, but it can be the optimum method for solving this problem. However, you have to be careful: you can easily lose your internal and application data by using this method, so don’t hesitate to take a backup of your valuable data and follow the steps here described.
As you can see, I have tried to introduce all working methods which can help to fix this issue. Have I been of any help?