How to Solve Galaxy S7 Screen Side Distorted Look

Samsung’s Galaxy S7 improves on the S6 in many ways. It looks even better, it is much faster and waterproof too, but don’t you let yourself fooled by the idea of perfection. There is no such a handset on the current market and the sooner you accept that, the better it will be.
For example, there are many owners taking picture using the front camera of Galaxy S7 device, but the result is not at all great. They claim that the image at the screen side looks slightly distorted. Is this your case too?
Is your device faulty or is there a magical trick that might help you with this issue? Let me tell you that there is no problem with your Galaxy S7, but it all comes from the fact that the front camera of your smartphone uses wide-angle lens. This is supposed to be perfect for taking wide-angle photos when using the camera close to the subject, but don’t forget that some image distortion may occur in wide-angle photos especially at the edges of the preview screen due to the properties of the lens used to take a wider screen image.
This has nothing to do with the handset’s actual performance, so my advice is to do a simple trick: enable the Shape correction option to correct your face shape.
This option usually corrects your face distorted at the edges dynamically according to angles and distance from center, so set the option on Beauty effects. However, you should understand from the start that after shape correction, the background may appear slightly distorted as long as the correction algorithm is applied to overall image.
How to Solve Galaxy S7 Screen Side Distorted Look by setting the Shape correction option:
- First of all, you have to press Home button twice to launch camera app instantly;
- Choose Mode;
- Then, select Selfie Mode;
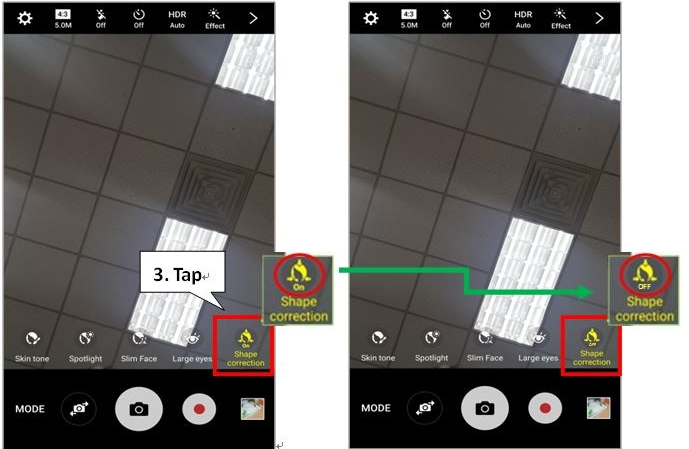
- Once being there, tap the Beauty effects icon;
- Tap Shape correction to turn off;
- After shape correction, the background will still be slightly distorted (as I have told you, the correction algorithm is applied to the entire image). If you don’t like the result, use after deactivating the Shape correction.
If you have any questions or encounter any problems while applying the steps from this guide, please let us know your questions or problems in the comment box below. A member of our team will help you in no time!


User forum
0 messages