How to Disable/Remove Bloatware from any Android device
We are all used to see how manufacturers and carriers often load Android handsets with their own apps that we don’t generally need to use. All they do is cluttering the system or draining resources in the background and taking away your limited memory space that could actually be used to install your favorite apps, so it’s time to take some measures and disable / remove the bloatware from your Android handset.
So, it really doesn’t matter if you are the owner of a LG, Samsung, Sony, HTC, Motorola device and so on; we can tell you one thing for sure: Android 4.0 and newer versions of Android give you the chance to get rid of bloatware easily, so don’t hesitate to do so.
I. How to Disable Bloatware from any Android 4.0+ device:
We want to tell you from the start that this procedure that we have here only disables the useless software. After preceding all the steps, the app won’t appear in your app drawer any longer, which practically means that you cannot run it in the background. This will declutter your phone and save some battery power, but that’s pretty much all that it can do.
However, the bloatware apps remain installed in the system partition, being only locked in read-only mode, so they’ll persist after you factory reset your phone. And that means just one thing: they will still waste your phone’s valuable storage space.
- Start by opening the Settings screen and then tap Apps; then, you must swipe over to the All category;
- Scroll down until you find the preinstalled app you want to disable and then tap it (if that app has an icon in your app drawer, you can press and hold on the app’s icon and drag it to the App Info option at the top of your screen to access its details screen);
- Tap the Disable button in order to disable a preinstalled app;
- You’ll immediately see a warning, so make sure that you aren’t disabling anything important. Don’t forget that there are several that built-in Android system apps cannot be disabled, but this rule doesn’t apply for all apps and there’s where you can make a change.
In case of wanting to find disabled apps, they are at the bottom of the All apps list. All you have to do is to tap a disabled app and then tap the Enable button in order to re-enable it.
II. How to Remove Bloatware from any Android 4.0+ device:
If the method that we have just presented you is not what you are looking for and you want to remove bloatware and free up the space on your Android handset, here’s what you have to do:
1. Root and Use an App
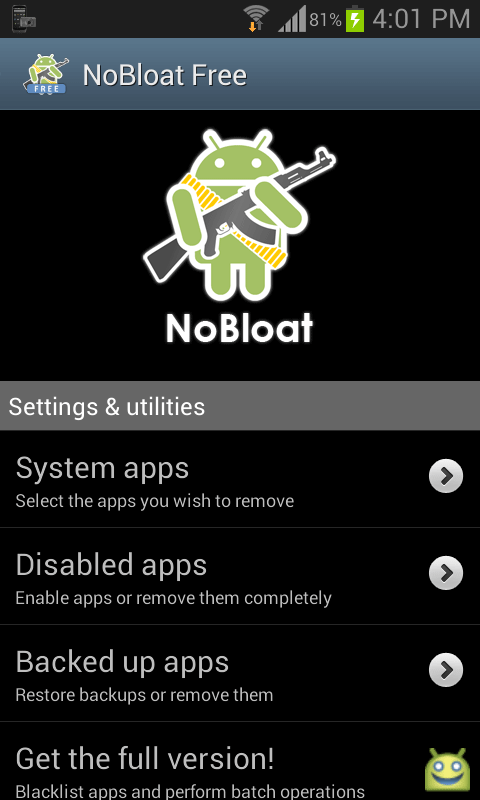
If you root your handset, then you can simply use an app delete the bloatware apps from your system. Let’s take the example of NoBloat which is a managing app that is used to delete unwanted system apps that comes pre-installed with the device.
NoBloat is well-known for its ability to automatically place backups on your external storage which you can restore at any time, so all you practically have to so is selecting the bloatware on your phone and clicking on the Delete option. After doing that, the app will automatically take backups and un-install the bloatware.
How to Remove Bloatware from any Android device by using NoBloat:
- Install NoBloat Free from the Play Store by using this link;
- After the app is installed on your device, launch it by opening your App Drawer and then tapping on the app’s icon;
- The app will ask you to grant Superuser privileges; don’t hesitate to hit the ‘Grant’ button;
- The main interface will immediately show you the options which are available to you; you must tap on the ‘System apps’ option;
- After that, you’ll see the list of all the apps installed on your Android handset; these are the apps that you can remove from your device, so it’s time to tap on any app you wish to remove;
- You will see the following options to choose from: Disable – It will disable the app on your device; Backup – It will backup the app; Backup and delete – It will backup the selected app and also delete it; Delete without backup – It will delete the app without any backup; you must choose the last option and then ‘Okay’ for removing the app from your device;
- The procedure of removing the selected app from your phone will immediately start;
- After the app has been removed, it will no longer appear in the apps list.
You can also use the Titanium Backup app which comes with an useful function that gives you permission to tap the app and select Uninstall instead of Freeze, but be sure that you understand what a rooting procedure means in the first place.
So, rooting gives you the ability to delete unwanted pre-installed applications, as well as the chance to install a custom ROM, to overclock your phone’s processor (which means speeding up your phone) and even to access more advanced applications such as root call blockers or root memory managers. But this is a risky procedure, especially for those that have never done anything like that before.
An unsuccessful rooting operation might brick your handset, while a successful root will void the handset’s warranty.
2. Use a Script Without Rooting
So, have you decided that you want to stay away from rooting? Then, you should know that there’s a special bloatware removal script on the XDA Developers forum that has the ability to delete system apps without any rooting required.
Anyway, we want to tell you from the start that you’ll need to edit the script by hand, so this could be a fast way to remove bloatware on multiple devices if you are an advanced Android user only, while average users should think twice before proceeding and risking to damage or brick their handset.
3. Flash a Custom ROM
Replacing the stock ROM with a custom ROM like Cyanogenmod means overwriting the operating system and replacing it with the custom ROM and this is exactly that sort of operation that will free up the space currently being used for bloatware.
But we want to remind you that a custom ROM is not an official one, not to mention that installing it is a risky procedure. You can end up damaging your Android phone during the procedure or even after if the custom ROM = is not stable or if it comes with bugs.
II. How to Disable Bloatware on Older Versions of Android:
1. Root and Use an App
When it comes to older versions of Android, all you can do is disabling the bloatware (no removing option available) and things are a little different. To be more precise, you can root your Android handset and use an app like Titanium Backup or Gemini App Manager in order to disable the app – this procedure is commonly known as “freezing” an app.
How to Disable Bloatware on Older Versions of Android with Gemini App Manager:
- Install Gemini App Manager from Google Play (use this link);
- Launch it and tap the menu button; you must tap ‘More’ in the menu and select ‘Expert Mode’;
- Scroll through the apps carefully choose what app you want to disable (unfreeze); if you want to speed things up, feel free to tap the Filter Packages button and select ‘Of System’; this will display just the preinstalled system apps;
- After locating the app you want to freeze, you must long-press it to view the menu;
- Tap the Block App option Superuser app will prompt you to allow the root access so that Gemini App Manager can continue the operation;
- Gemini App Manager will disable the app and you’ll see a lock icon beneath the app, indicating that it’s disabled;
- If you want to unfreeze it later, then press the app and tap the ‘Unblock App’ option.
2. Use a third-party launcher
But if rooting isn’t an option, you should try using a third-party launcher such as Nova Launcher that has a built-in feature that allows you to hide app icons from your app drawer. The apps will remain running in the background, so there is nothing that you can do about the waste of battery power, but at least you’ll reduce the clutter and you’ll feel the difference.
We only hope that with the help of this tutorial, getting rid of bloatware will be much easier. Is there any step or method that you don’t understand? Then, just use the comments are and we’ll try our best to help you.



User forum
0 messages