
Android Charging Problems: Complete Guide to Solutions
![]() Updated on
Updated on
Plugging in a nearly dead phone only to discover it isn’t charging can be frustrating. While the situation may seem serious at first, charging problems are often caused by simple issues such as faulty accessories, dirty ports, or temporary software glitches. Before assuming the device is damaged, it’s worth running through a few proven troubleshooting steps.
Why is My Android Not Charging?
What You’ll Need
- Your Android device
- Original or certified charging cable
- Power adapter
- Access to device settings
- Soft cloth for cleaning
Check Whether the Phone Is Actually Charging
Before replacing cables or chargers, it helps to confirm whether the phone is drawing power at all. Apps like Ampere can show real-time charging current and indicate whether power is flowing into the battery. If the app displays a green value, the phone is charging; a negative or orange reading usually means the phone is consuming more power than it’s receiving.
Inspect the Charging Cable for Damage
Charging cables are one of the most common points of failure. Frequent bending, pulling, tangling, and general wear can damage internal wiring even when the cable looks fine on the outside. Any visible fraying, sharp bends, or loose connectors are strong indicators that the cable may no longer function reliably.
Testing the cable with another device or trying a different cable with the phone can quickly confirm whether the cable is the issue. It’s also worth noting that some manufacturers use proprietary fast-charging standards, meaning third-party or mismatched cables may charge slowly or inconsistently.
Examine the Power Adapter
The wall adapter is just as important as the cable. Physical damage such as cracks, bent prongs, or loose ports can prevent proper power delivery. Testing the adapter with another device or swapping it with a known working charger can help rule it out as the cause.
Using a charger that doesn’t meet the phone’s power requirements may also result in slow or failed charging, especially for newer devices that support fast charging.
Check and Clean the Charging Port
Dust, lint, and debris often accumulate inside charging ports over time. Even a small buildup can prevent the cable from making a solid connection, leading to intermittent or failed charging.
Carefully inspecting the port with a light can reveal blockages. Cleaning should be done gently using compressed air or a soft brush. Sharp metal objects should be avoided, as they can damage the port’s internal pins. If the port feels loose or shows signs of corrosion, hardware wear may be the underlying issue.
If the device was recently exposed to moisture, charging may be temporarily disabled due to a moisture detection warning. In this case, the phone will resume charging once the port is fully dry.
Try Wireless Charging If Available
For phones that support wireless charging, this can be a useful diagnostic step. If the device charges wirelessly but not through the cable, the issue likely lies with the charging port or accessories rather than the battery itself.
Wireless charging can also serve as a temporary workaround while the root cause is identified or repaired.
Switch to a Different Power Source
Faulty outlets, weak power strips, or low-output USB ports can all interfere with charging. Plugging another device into the same outlet can help determine whether the power source is reliable.
Charging directly from a wall outlet is generally more effective than using a computer USB port or extension strip, which may not supply sufficient power.
Restart or Power Off the Phone
Temporary software glitches or background processes can sometimes interfere with charging behavior. Restarting the device—or powering it off completely—can reset system processes and improve charging performance, especially if the phone was under heavy use before being plugged in.

Consider Battery Health and Replacement
Phones with removable batteries are rare, but replacing or reseating the battery can still resolve charging issues on older models. For devices with non-removable batteries, replacement is possible but requires technical expertise and is best handled by a professional repair service.
If the device is still under warranty or covered by insurance, repair or replacement options should be explored before attempting any hardware fixes.
Account for a Fully Depleted Battery
When a battery is completely drained, the phone may take longer than usual to respond after being plugged in. In such cases, leaving the device connected to a charger for an extended period is often enough for it to recover.
If the screen remains unresponsive after several minutes, a forced restart may help trigger the charging process.
Check for Software Updates
Software bugs can occasionally affect charging behavior. If the phone has enough power to operate, checking for system updates is worthwhile. Installing the latest updates can resolve known issues related to battery management or power delivery.
Here is a step-by-step guide on how to check for and install software updates on your Android device.
Step 1: Open the Settings app
First, unlock your phone and find the Settings app in your app drawer or on your home screen. Tap it to open the settings menu.

Step 2: Scroll down and tap System
Scroll down to the bottom of the Settings menu and tap on System. On some devices, this option might be labeled as About phone or have a direct Software update option in the main menu.

Step 3: Select System Update
Within the System menu, you will find an option for System update (or Software update). Tap on it to proceed.

Step 4: Download and Install Update
Your phone will automatically connect to the server to check for the latest updates. If one is available, you will see the update details and a Download & Install button. Tap it and follow the on-screen instructions to complete the process.

After the update is downloaded and installed, your phone will restart to apply the changes. Your device is now running the latest software version!
Make sure the device is connected to Wi-Fi and has sufficient battery power before starting the update.
Note: Menu names may vary slightly depending on the manufacturer and Android version.
Other Solutions
- Boot your phone into Safe Mode to check whether third-party apps are causing the issue. In Safe Mode, only pre-installed system apps run. If charging works normally, one or more recently installed or incompatible apps may be responsible.
- Reset app preferences to restore default settings for disabled apps, notifications, and background restrictions without deleting any personal data. Go to Settings → Apps → Reset app preferences and confirm the action.

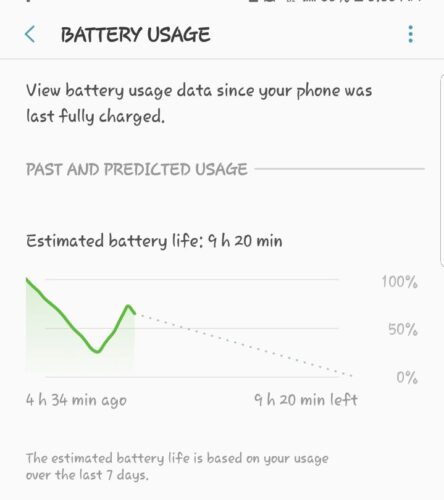
3. Check Battery Health
- Navigate to Settings > Battery > Battery Usage to assess battery health.
- If the battery is deteriorating, consider replacing it by contacting the manufacturer or visiting a certified service center.
Method Comparison
| Method | Pros | Cons |
|---|---|---|
| Check Cable and Adapter | Quick and easy to perform | Might require new accessories |
| Examine Charging Port | Non-invasive | Requires careful handling |
| Software Troubleshooting | Addresses glitches | May need technical knowledge |
| Battery Health | Improves device longevity | Potential cost for replacement |
Tips and Best Practices
- Always use the original charging accessories provided with your device.
- Avoid using the device while it is charging to prevent overheating.
- Regularly clean the charging port to prevent buildup of dust and debris.
- Keep your software up to date to benefit from the latest bug fixes.
- If possible, use a surge protector to safeguard your device from power fluctuations.
- Monitor battery usage and avoid apps that are excessively draining the battery.
- Consider charging the device using a wall outlet instead of a computer USB port for faster charging.
Common Issues and Solutions
Problem: Device charges slowly.
Solution: Use a stronger power adapter or check for background apps consuming power.
Problem: Device only charges when in a specific position.
Solution: Clean the charging port and check the cable for damage.
Problem: Device shows “charging” but battery percentage doesn’t increase.
Solution: Restart the device and try using a different charger and cable.
Problem: Device not recognized when connected to a computer.
Solution: Check USB connection settings and try a different USB port or cable.
What If None of These Fixes Work?
If charging problems persist after trying all of the above, the issue may be hardware-related. Checking warranty or insurance coverage should be the next step, as manufacturers typically cover defects not caused by accidental damage.
When repair isn’t feasible, replacing the device may be the most practical option. Choosing a phone known for strong battery performance and following good charging habits can help prevent similar issues in the future.
A slow charge could be due to a weak power source, a faulty cable, or background apps consuming too much power.
This may indicate a problem with the charging port or non-compatible cables. Try cleaning the port and using certified cables.
Yes, software updates can fix bugs that may affect charging. Always keep your device updated.
Modern phones have protections to prevent overcharging, but it’s generally better to unplug once it’s fully charged.
Replace them if they show signs of wear or stop functioning effectively. Certified replacements are recommended.

Improve this guide

User forum
0 messages