How to Enter Recovery Mode on Google Nexus 5

After seeing Google Nexus 5 getting a hard reset in a previous article, we thought that it would be better if we also had the chance to share another important process for your Android smartphone. I am talking about showing you how to enter Recovery Mode on your Google Nexus 5 in order to perform different task like erasing unnecessary files or adding files to your device. This tutorial will briefly lead us on what a Custom Recovery Mode is and how can we enter Recovery Mode on your Google Nexus 5.
Check out: how to hard reset the Google Nexus 5
What Is a Custom Recovery Mode
A Custom Recovery Mode is an option, or a menu if you like, on Android device that runs between the ROM and the bootloader. With a recovery, we can flash or add new ROMs, perform back-ups or fully wipe the contents of our device.
Now, before we proceed with the simple guide on how to enter Recovery Mode, one must bear that your Nexus 5 smartphone must be rooted. A rooted device, in this case, a rooted Nexus 5, lets you customize your handset the way you want it. In case you haven’t got a rooted Nexus 5, hit the link button on a full guide on how to root your Nexus 5 do note that gaining root access is requaired only if you want to flash a custom recovery image like TWRP or CWM recovery; else entering recovery mode can be performed on both rooted and loked handsets.
How to Boot Recovery on Google Nexus 5 using hardware method
- Turn off the phone.
- Press volume down and power buttons at the same time.
- The boot loader mode will be displayed.
- From there choose “recovery” and you are done.
How to Enter Recovery Mode on Nexus 5 using a dedicated tool
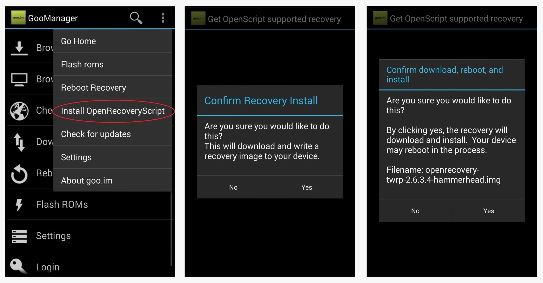
Step 1. You need to first install GooManager by accessing this link. In case you were wondering, the Geo Manager is a utility used for any softModder, that lets us do things like browsing, downloading, flashing ROMs or installing custom recoveries.
Step 2. Install Recovery from GooManager by opening the app and tapping the menu icon on the top right. Hit the option Install OpenRecoveryScript and the TWRP will begin downloading.
Step 3. After the Recovery Mode is installed, make sure you perform a thorough backup.
Step 4. With the backup secured, just access Reboot your Nexus 5 device into Bootloader mode. To do that, hold the Volume Down and Up buttons to power on the device. Once your device is in bootloader mode, use the Volume keys to go through the series of options available on the screen. Now you would want to tap the Recovery Mode to enter with the Power button. Thus, you enter Recovery Mode on your Google Nexus 5.
This is all Nexus 5 users. All should run very smoothly. In case there are any issues with your process, don’t forget to write your thoughts! Cheers!


User forum
0 messages