Add Chrome Custom Tabs to your Apps
3 min. read
Updated on
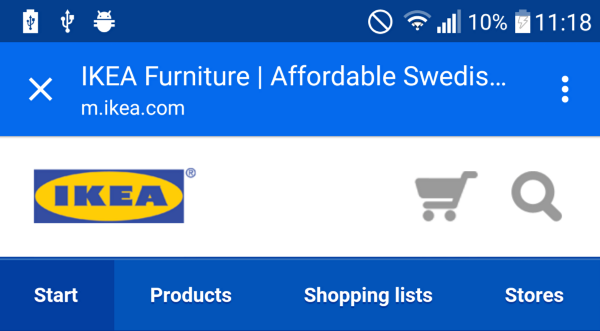
Alongside Android Marshmallow, Google debuted a new Android feature called Chrome Custom Tabs, which lets developers to use Chrome as their in-app browser instead of WebView. Up to now, developers had no more than two options: they could choose to launch the system browser or WebView. But you know how unpredictable this really is, so I bet that the idea of an alternative sounds more than tempting at the moment.
Let me tell you from the start that a Custom Tab is the ideal solution as long as it lets you open web URLs within the context of your application using the Chrome Browser installed on the device. These Tabs are able to offer an improved experience when you are transitioning between the app’s native content and the web, not to mention the fact that apps can display pages internally using a faster and more secure browser in Chrome, which comes with the added benefit of having all of your saved passwords and synced data right there waiting for you in any app.
However, the reality cannot be denied: it seems that developers have not yet adopted the new Chrome Custom Tabs feature and that is why so many Android apps still use WebView. Do you want to change that? Well, there is a new app from developer Arunkumar that you can take advantage of if you want to force all your apps to use Chrome Custom Tabs right now and here I am to guide you all the way.
The app is known as Chromer and it does its job with no issues, but note that your handset must run at least on Android version 4.1 if you want to succeed. And don’t forget one more thing: you must also have Google Chrome, Chrome Beta, or Chrome Dev installed or else this guide is not for you.
How to Add Chrome Custom Tabs to your Apps:
- First of all, you have to take Chromer from the Google Play Store by entering here;
- Install it on your Android handset;
- It’s time to launch the app;
- This is the ideal moment to personalize the Chrome Custom Tabs interface with all of the options provided;
- Tap Choose Toolbar color to change the look of the address bar and status bar at the top of any page (you must also have the Colored Toolbar option ticked for this feature);
- Choose to show webpage titles at the top of the screen with the Show title option;
- You can also tweak transition animations by ticking the box next to Animations and choosing your favorite animation from the last entry in this menu;
- Set Chromer as your default web browser to use Chrome Custom Tabs system-wide by tapping the Set Default Browser button;
- Afterwards, select Chromer from the menu that pops up next;
- Also press Always;
- You can start browsing the Web using Chrome Custom Tabs. From this moment, any app that used to use WebView to launch links internally will now use Chrome Custom Tabs instead.


User forum
0 messages