
How to Easily Unroot your Android Device
![]() 3 min. read
3 min. read
![]() Published on
Published on
Share this article

Improve this guide
Rooting is fun and yet, it is not what you are always looking for. For example, if you want to take your phone back to service, don’t you think that it’s better to restore the warranty of your device?
Or maybe you simply miss that pure Android system experience, you have just flashed a custom ROM that disappoints you or you are disturbed by some serious software related issues such as lags, excessive heating, bugs, force close errors, battery drain, screen freeze and more.
Things should not be like this and the beauty of Android is also about changing your mind.
To be more precise, it’s OK to want to unroot your Android device and here I am to help you.
Learn How to Unroot your Android Device with SuperUser app:
I know that you are here looking for a way to unroot your Android smartphone and the same SuperSU app that you have used from the start is the one that can help you this time too.
This will remove root completely from any rooted Android smartphone or tablet, so use the below steps:
- For the procedure to work, you must have SuperUser app installed, so download SuperSU app from Play Store;
- Now, install it on your device;
- If you have SuperSU app already installed, you can skip this step;
- Then, run the SuperSU app;
- Go to Settings;
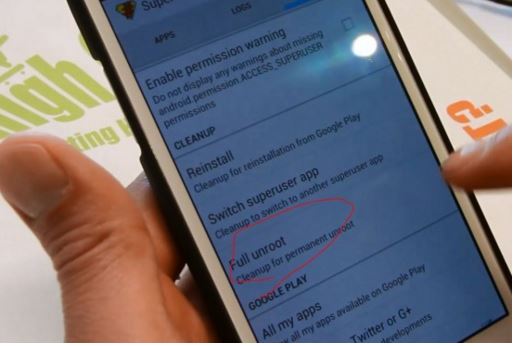
- Don’t hesitate to scroll down to the “Cleanup” section;
- Now, choose “Full unroot”;
- Read the confirmation prompt and tap “Continue”.
- That’s it! You should reboot your Android phone to save all the changes that you’ve made and be sure that it will be completely unrooted;
- However, if you still see SuperSU or Superuser app in your drawer, just uninstall it.
Learn How to Unroot your Android Device if you own a Samsung Device:
What about those using a Samsung handset? Have you ever applied the steps from these proceudures: How to Root Samsung Galaxy A7 on Android 5.0.2 Lollipop, Easily Root MetroPCS Samsung Galaxy Core, How to Root Samsung Galaxy S5 using Odin (compatible with T-Mobile, International, Canada, and more), How to Root Samsung Galaxy S5 Mini, How to Root Samsung Galaxy Tab 4 in a minute or less, How to Root Samsung Galaxy Note 3 SM-N900 and much more?Things are a little different in this case, but this guide will show you everything that needs to be done:
- Download the stock firmware for your device;
- Unzip the firmware to find the .tar.md5 file that I am talking about;
- Download and the latest Odin version too;
- Now, it’s time to turn off the handset;
- Hold the Volume Down, Home, and Power buttons to boot it in Download mode;
- Then, connect it to your computer via the original USB cord;
- You should see a green box on the left side of the “ID:COM” section;
- Don’t hesitate to tap the .PDA button in Odin;
- Browse for the .tar.md5 stock firmware file that you downloaded;
- Tick the “PDA” and “Auto Reboot” boxes, while all the other boxes are unchecked;
- Click the .Start button to begin the unroot process;
- At the end, you’ll see the usual “PASS!” message in the top box in Odin and your Samsung device should boot into the normal TouchWiz operating system.
However, in case of having a custom recovery installed, let me be clear about the fact that these procedures have nothing to do with that. They will remove root completely and that’s all!


User forum
0 messages