How to Unlock Google Nexus 5 Bootloader
4 min. read
Updated on

Are you thinking to unlock your Google’s Nexus 5 Bootloader? We totally agree with the idea of wanting more from your Android smartphone as long as once the bootloader is unlocked, it becomes pretty simple to flash a custom ROM or stock ROM.
But don’t get us wrong; we are not encouraging you on taking such a decision, but we are only here for offering you support for unlocking your LG Google Nexus 5.
You should know that things are not as simple as you might expect. Any unofficial procedure is risky and if you do not follow the procedure properly, you can end up with a bricked phone.
So, if you’re not comfortable with all these risks that you are exposing your Google Nexus 5 to, it’s time to stop now!
Review the risks:
- Unlocking the bootloader is an unofficial procedure which means that you have to accept that this will void the warranty of your handset, so the company doesn’t really take responsibility for anything you do to mess up your device after that;
- This operation could also cause physical injuries due to overheating; is this what you want for your Google Nexus 5?;
- The manufacturer can then no longer guarantee the full functionality of your handset after the bootloader is unlocked; that is a risk that you have to assume from the start;
- Carefully apply this guide only to Google Nexus 5 and no other Android handset;
- Do not think about mixing or skipping any step, we are not responsible either for the damage that would occur to your Nexus 5, so perform the tutorial at your own risk!
Preparatory steps:
- Prepare your PC for this operation by disabling the antivirus programs installed there as it could interfere with the process of unlocking Google’s Nexus 5 bootloader;
- Install the USB Drivers of your handset on the computer;
- Prepare the original USB cable;
- Enable the USB debugging by going to Settings->Developers options-> USB Debugging box and then confirming it;
- Also enable Developer Options by going to Settings>> About phone>> and tapping on Build number seven times in order to enable Developer options;
- Verify if your Google Nexus 5 has at least over 70% of battery charge or the handset will power off during the process; that may brick it and we are sure that this is not your plan;
- Don’t forget to make a full backup for your data; in case of being completely wiped out after performing this unlock procedure, your data will be safe.
Are you ready to begin the procedure? Here’s what you have to do:
How to Unlock your Google Nexus 5 Bootloader:
- Download the latest Android SDK from here and unzip the contents of the file;
- Turn off your Google Nexus 5;
- It’s time to reboot into fastboot mode by pressing Volume Down and the Power button in the same time;
- Connect your Nexus 5 device to your computer with a USB cable;
- Now, open the Android SDK > SDK > Platform-Tools directory;
- Right-click in an empty area while holding the shift key and then click ‘Open the command prompt here’;
- Enter this command: ‘fastboot devices’; you must get a serial number or your drivers are not installed correctly (let’s hope that this won’t be the case);
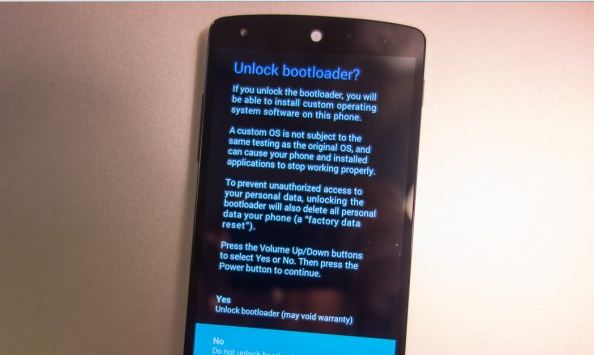
- Enter the following command: ‘fastboot oem unlock’ and then confirm with ‘Yes’ (in order to do so, just use the Volume keys to move and the Power button for confirmation);
- Enter the ‘fastboot reboot’ command and that was all.
- If everything went correctly, you should see an unlock icon during boot.
Fortunately, the unlocking of the bootloader process for your Google’s Nexus 5 smartphone can be easily done, but be careful about what you are doing and don’t hesitate to ask our help.
Any question can be directed to the comments section and we’d be glad to help you!


User forum
0 messages