
How to Hard Reset Your Android Smartphone and Tablet
![]() 12 min. read
12 min. read
![]() Updated on
Updated on
Share this article

Improve this guide
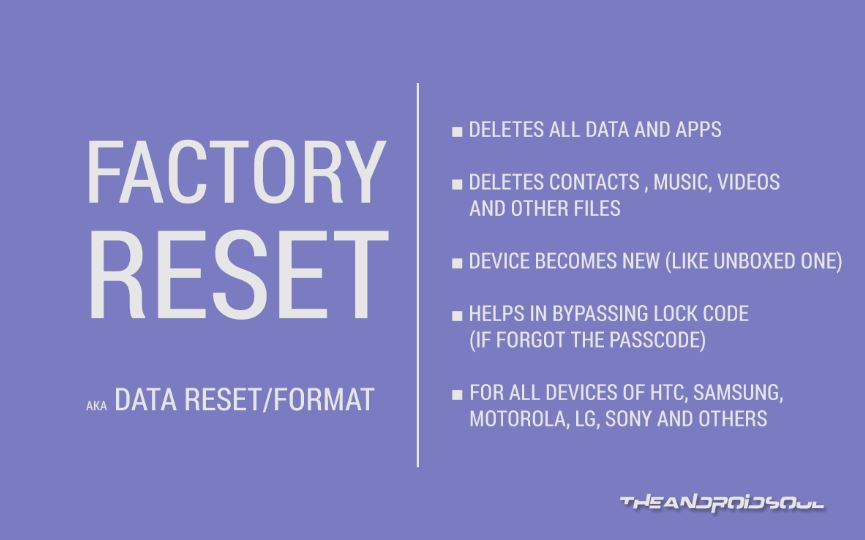
Sometimes performing a hard reset or a factory reset to your Android smartphone or tablet is like changing the oil to your car. It performs better, it acts faster and perhaps it prolongs the life of your Android device. And hard reset comes along with a formatting process of your smartphone or tablet. For those who don’t know, formatting is actually wiping all your apps, data or other info from your device like contacts, messages, photos, videos or other important stuff. This tutorial will show us how to backup our files before the hard reset, what is a hard reset, why we should perform a hard reset to format our Android smartphones or tablets and lastly how to hard reset Android devices like Samsung, HTC, Motorola, Sony or others.
HOW TO PERFORM BACKUP BEFORE HARD RESET
There is a certain task to be carried out prior to perform a hard reset, which is also called a factory reset, and that would be backing up all your data, files, apps, photos or videos from your internal memory to your pc. And there are plenty of ways to use to perform this backup process. You connect your device to your computer via an USB cable and perform the task, or just follow our BACKUP Guide that will help you successfully backup all your data to your computer.
More than that, you can also start backing-up by using Helium Android App, meaning that you will not have to use Root access. Another common method would be performing a backup by using a CWM or TWRP recovery, if they are installed on your Android. With the help of the CWM and TWRP recovery you can create a virtual system that can transfer all your data from your device to your pc with the Mount option promptly working.
WHY PERFORM A HARD RESET TO FORMAT AN ANDROID DEVICE OR TABLET
There are a lot of reasons of why we should perform a hard reset in order to format your device. For instance, I used to have an old Android device that has really successfully done its job, but instantly started failing on me at a certain time: I am talking about blockage, apps not working anymore, restarting, any virus taking over and so on. But once I reset my Android, meaning wiping all unnecessary data and backing-up all important ones, my smartphone became cool again. Well, you know what I mean.
Another simple reason is that you want to get rid of your old Android and trade it for a new one and want to erase all your data. This is what performing a hard reset means.
Also very important to consider: in case you have any issues with your devices running slowly or apps blocking or playing in re-run, just mind that simply uninstalling that particular app, won`t do. Yet, a complete hard reset will actually eliminate all the malware or the bad functioning from your device and will format your device. Simply put, if you want a “fresh-new baby smartphone” give it a hard reset. Case rest.
HOW TO PERFORM HARD RESET TO FORMAT YOUR ANDROID DEVICE AND TABLET FROM SAMSUNG, HTC, MOTOROLA, SONY OR OTHER
Well folks, here we are, the moment of true. Let`s see how we can perform a hard reset in order to format our Android devices like Samsung, HTC, Motorola, Sony and so on.
First, we will need to see what happens when carrying on with the Hard Reset process. There are two situations to be confronted with: 1. We can perform Hard Reset when Powering On our device properly. 2. We cannot perform Hard Reset when Powering On, but instead we can be using two methods such as Fastboot and Recovery for Hard Reset.
I. PERFORM HARD RESET WHEN POWERING ON OUR DEVICE PROPERLY
A hard reset or a factory reset can be best performed when your device is Powered On and starts as fresh. In this case, doing a Hard Reset means going to Settings, locating the option Backup and then reset. A Factory Data Reset option will appear, which will eventually hard reset your device. Tap on it and all your personal data like contacts, messages, call logs, photos or any other files from your internal data will be erased. In case you have files on your external SD, these will not be deleted.
NOTE: Do not forget to Backup all your files before proceeding with this Hard Reset process! Congratulation, your device is now Powered On and working just fine with all the formatting process being carried out just fine!
II. PERFORM HARD WORK WHEN CANNOT POWER ON OUR DEVICE PROPERLY
1. Using FASTBOOT for Hard Reset. This process is intended for all those devices that have Fastboot compatibility, but what concerns Samsung, only the Galaxy Nexus and the Nexus S are compatible with this method. To power off your device, remove the battery and put it back after 10 or 15 seconds. In case you own an Android device with a non-removable battery, just perform a Force Power Off, by pressing and holding the Power button for 20 seconds. This will put your phone to sleep immediately. Next, make sure you follow exactly the steps below.
- Get your phone ready and disconnect it from your pc. Next, go to Settings>About phone>Build number, tap several times on that until enable the develop options. Move on to enable USB Debugging by opening Settings>Developer options>USB Debugging>Tap USB Debugging.
- Reconnect you phone to your computer via an USB cable. Tick the screen and tap OK in case there is a pop-up screen showing you “Allow USB debugging?”
- Disconnect the phone again. Now you have to download the FASTBOOT files.
- After downloading the files, extract them to a folder from your computer. You can name your folder fastboot folder, to make sure you don’t forget where it is.
- Open command window in your fastboot folder. You can do that by holding the shift button and then right clicking on a white space inside the folder; get your list of options and then click “Open command window here”. Now you have an opened cmd window within your fastboot folder.
- Booth your smartphone into fastboot mode. Find below some easy to-follow tips for each Android device:
- Motorola. Turn off your device, then press and hold Volume Down and Power Button all together until the screen says Fastboot. Now you can connect you android to your pc.
- Samsung. Except for the Nexus S and Galaxy Nexus that carry out the same mode as Motorola, there is no fastboot mode for the other models.
- HTC. You should first go to Settings>Power option>disable Fast boot. Turn off your Android and press Volume Down and hold Power Button together until the screen gets “3 Androids” written. Play with the Volume Buttons to move the fastboot and press Power Button to select it. Now, connect your device to your computer and Fastboot will change to Fastboot USB.
- LG: It should be easier with this one. Just Power it Off and connect it to your pc, pressing and holding Volume Up.
- Sony: Carry on with the same process as LG, until a LED light will turn Blue.
- A cmd window will be opening up. Use an USB cable to connect your device to your pc and type adb devices in the cmd window
- Carry on with the Factory Reset process. Type fastboot erase userdata and tap enter.
- Type fastboot reboot in order to reboot your device.
This is it. After your device is rebooted, you now have a fresh new Android you can play with it as it was your first time.
2. Using RECOVERY for Hard Reset. If all the info above with the Fastboot recovery being carried out step-by-step didn`t seem to help at all, there is also the Recovery mode enhanced for you that will actually help Hard Reset your Android device. This time, we will try a different approach, as we will take each device, one by one, and try to explain the necessary paces for a successful Hard Reset, using the Recovery mode. We will start with Samsung, carry on with HTC and slowly moving on with Motorola, Sony and LG.
SAMSUNG
Follow the steps below in order to successfully Hard Reset your Samsung phone or tablet.
Step 1. Power off your handset after disconnecting it from your pc.
Step 2. Before we proceed, you have to take the process separately, first relating to the Samsung range of phones and then moving further on with the Samsung Galaxy tablets.
Samsung Galaxy smartphones. As mentioned previously, it should be easy carrying on with the Recovery mode. Just press and hold Volume Up + Power + Home until the logo with Samsung appears on the screen. And that`s all.
Samsung Galaxy tablets. For the Tab Pro and the Note Pro tablets, use the same process carried out on the Samsung Smartphones. Press and hold the Volume Up + Power + Home until the Samsung logo flashes onto the screen. However, for those tablets that don’t have a Home button in the middle, then you can use one of the options below:
- Option 1. Press and hold both Power and Volume until two icons will pop-up onto the screen. Press Volume Up, go to Recovery option and select by using the Volume Up key to hit the Recovery mode.
- Option 2. Press and hold the Power and the Volume Down buttons until the Recovery mode appears along with Samsung logo on the screen for a couple of times. Keep holding the buttons until a blue text appears with the Recovery mode written on top.
Step 3. With the Galaxy devices being already set, you are in the Recovery mode. Now, in the Recovery mode, browse up and down the options with the Volume keys and then choose an option by using the Home/Power button.
Step 4. Select the option Wipe Data/Factory Reset with the Power button.
Step 4. A message with “Yes – delete all user data” will appear. Select it to confirm the erasing process. Now you are on the verge of wiping all your data.
Step 5. After the Hard Reset has done its job, the Samsung handset will ask you to “Reboot system now” to complete the Hard Reset.
Voila! Your Samsung Android device is as new again. Hit the Google Play Store and install whatever apps you want.
HTC
Follow the steps below in order to successfully Hard Reset your HTC phone. This one should be easier.
Step 1. Disconnect your HTC from your pc and power off.
Step 2. Press and then hold Volume Down and then press again the Power key just once and then hold on the Volume Down until an HBoot screen with 3 Androids will appear at the bottom of the screen.
Step3. Navigate your way through until you reach the move to Factory Reset option. Selecti it by using the Power button.
Step 4. Factory Reset will appear and it will erase all the data from the device.
MOTOROLA
Regardless of the type of Motorola you have, be it the fresher Moto G or Moto X, or the older ones Atrix, Atric 2 or Atrix HD, you will need to first enter the Boot Mode Selection Menu. After you do that, make sure you select recovery mode and carry on with the steps below.
Step 1. Disconnect your HTC from your pc and power off.
Step 2. Press Volume Down and then Power button until a “Boot Mode Selection Menu” with Fastboot will appear at the top of the screen. In more recent devices, a list of options available will appear on the screen, while on the older versions you will have to press the Volume Down key in order to get the option you need.
Step 3. Select the Recovery option with the Volume Down and then select it with Volume Up. Next, you have to boot into Android Recovery. Do that by just holding Volume Up and pressing the Power key just once. An option will appear.
Step 4. Select Wipe Data/Factory Reset and hit the Power key.
Step 5. The message “Yes – delete all user data” will appear on the screen. Just hit the option and Factory Reset will begin.
Step 6. “Reboot system now” to complete the process.
LG
Step 1. Disconnect your LG device from your pc and then power it off.
Step 2. There are a multiple key combinations for you choose to from, that differ from one device to another.
- LG G2, 2013 model and other models from that period. Press and first hold Volume Down and then Power key until an LG logo would have appeared on the screen. Release the Power button and hit it again, without letting go of the Volume Down button.
- LG Optimus 2X, with the Home button, press and then hold together Volume Down + Power + Home.
Step 3. The screen will show a message with Factory Hard Reset.
Step 4. Press the Power button to confirm and then start formatting the handset.
Step 5. After wiping all your data, you will reboot your device to complete the process.
Sony
Since all Sony handsets don’t sport a default Recovery mode, you can actually Power On your device by using Option 1 described at the Samsung section, or you can use Option 2 in case you cannot Power On your device.
Conclusion.
Well guys, this is it! We have tried to explain to you in details what is a Hard Reset, why we perform a Hard Reset, followed by a step-by step guide on how to perform a Hard Reset using the Fastboot or the Recovery Mode when the device cannot Power On, or the method we use for Hard Reset when the device can Power On.
We have also tried to detail the process for each of devices mentioned in the article, and if there is one piece of device that we have forgotten, please do feel free to tell us and we will immediately take action. Don’t forget to write and tell us what you think, if you find it hard to perform a Hard Reset or if you have successfully Hard Reset your device or not! Cheers!

User forum
0 messages