Restore Software Status to Official on HTC One M9
3 min. read
Updated on

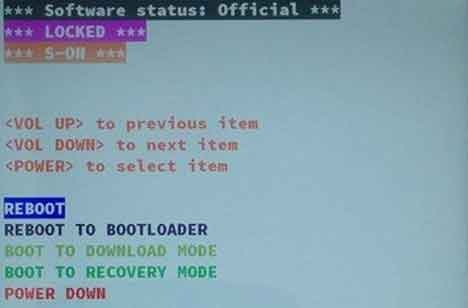
Every HTC one M9 handset comes with a locked bootloader, so when rebooting to the bootloader you’ll see Software Status at the top marked as Official by default.
However, the device also comes with various security layers to detect any potential unauthorized software tampering and this will turn to Modified once you tamper with the device. Can you say no such temptations? You should learn how to restore Software Status to Official on your HTC One M9 and have the fun that you deserve.
HTC can’t block the developers any longer as long as scotty1223 of XDA has succeeded in restoring the software status to Official and here I am to guide you all the way. Before starting the actual operation, there are some aspects to take care of: you have to download and install HTC USB Drivers on your computer, to enable USB Debugging and to set up ADB drivers on your PC or download and extract the minimal ADB and Fastboot tool on your PC: mfastboot-v2.zip from here.
Even more, keep in mind that this guide cannot be successful if you don’t apply it on a rooted HTC One M9. If you haven’t rooted your smartphone, use this rooting guide to take care of this aspect. And no less important, check the battery status on your One M9. I recommend to charge your smartphone as long as it could get turned off in the middle of the process from below and so, a soft brick might be issued. This is not what you need, so plug in the charger only if the battery power left is lower than 60% and have patience.
How to Restore Software Status to Official on your HTC One M9:
- Download and install HxD – Hex editor with the help of this link;
- Go to the folder where you’ve extracted the ADB and Fastboot files and open a command prompt;
- Connect your HTC One M9 to the PC by using uts USB cable;
- Execute the following commands in the command prompt previously opened in order to get the P8 file from your device:
adb shell
su - Upon entering the su command, you may get a SuperSU request on the device, so grant it:
dd if=/dev/block/mmcblk0p8 of=/sdcard/mmcblk0p8
exit - The P8 file is now in your SDcard, so move it to your PC by entering:
adb pull /sdcard/mmcblk0p8 - Open the file with HxD editor and immediately search for the 00408400 string;
- The fifth digit is the tampered flag. Overwrite the existing value with a 00 and save the changes as mmcblk0p8mod.img;
- Push the modified P8 file back to your device. To do this, first boot your device to bootloader mode using the below command:
adb reboot bootloader - In fastboot mode, enter the following command to flash the modified P8 file to your device:
fastboot flash pg2fs mmcblk0p8mod.img - You should see Software status: Official at the top of your device’s bootloader when rebooting, as a sign that you have been successful.
That was all that you had to do! Let me know if you need further assistance.


User forum
1 messages