Flash Android 7.0 N Developer Preview 2 on Nexus 6P
The first Developer Preview of Android N offered us a sneak peek at the next platform, but things move really fast and the second release is ready for you to enjoy on your Nexus 6P.
In case of wondering about the Android 7.0 N Developer Preview 2, let me tell you that it fixes a few bugs such as not being able to connect to hidden Wi-Fi networks (AOSP 203116), those annoying Multiwindow pauses (AOSP 203424), as well as Direct Reply closing an open activity (AOSP 204411), not to mention that it comes with a set of fresh features too such as Vulkan (a new 3D rendering API), Launcher shortcuts, or interesting API changes.
The easiest way to get this later preview update is by enrolling your device in the Android Beta Program or you can choose to flash the latest Android 7.0 N Developer Preview 2 on Nexus 6P with the help of this procedure.
If this is your wish too and you feel ready to skip any potential waiting time, let me warn you about the fact that the root access will not survive the flashing process and all data will be completely wiped from your device in the process. In order to pass this, don’t hesitate to take to backup all your sensitive data before starting the Android N 7.0 Factory Image installation.
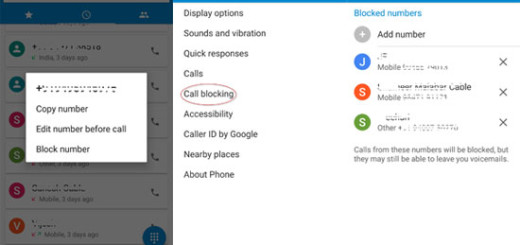
Then, remember that you must enter into Developer Options menu and enable the USB Debugging on your Google Nexus 6P. If you can’t find Developer Options, you should go to Settings> About Phone and tap 7 times on the Build Number text. Go back to Settings and there you will find the Developer Options menu.
Then, setup the Android SDK bundle on your computer as this will install all the files your computer needs in order to be able to detect your phone. For that, you must download Android SDK from here. Up next, go to the SDK installation directory and launch the SDK Manager exe. This can be used to download and install all required SDK packages and usb drivers.
After the SDK Manager is done installing the needed files, you should locate the platform-tools folder under the SDK installation directory. Here you will later copy the installation files of Android 7.0 N Dev Preview 2 Factory Image.
And let me be clear about the fact that I encourage you to apply the below steps only if you are an advanced user. All the responsibility for the result is upon you!
How to Flash Android 7.0 N Developer Preview 2 on Nexus 6P:
- Download the factory image archive by accessing this direct link;
- Then, extract files from the archive in the platform-tools folder (the folder that you have obtained while setting up the SDK);
- Turn off your Nexus hansdet;
- Up next, boot it in Fastboot Mode;
- Connect your phone to PC with the help of the original usb cord;
- Get to ‘platform-tools’ folder where you’ve extracted the installation files;
- Now, you have to launch the flash-all.bat installer script;
- Confirm the Android 7.0 N Developer Preview installation process by tapping OK;
- Then, you must simply reboot the Nexus 6P phone in normal mode.