
Universal root tutorial for Galaxy S4, S3, Note 3, Note 2 and more (without losing warranty)
![]() 5 min. read
5 min. read
![]() Updated on
Updated on
Share this article

Improve this guide
Universal Root De La Vega was a huge release a few weeks ago thanks to the fact that it can easily root your Samsung Galaxy device without triggering KNOX. You are probably aware of the fact that Samsung has started to release its Android 4.3 updates with KNOX implementation for its entire Galaxy line, but unfortunately none of the CF-Auto-Root tool or any other rooting methods that you might know weren’t designed for that. So, by trying to root your device with any of these tools, you would simply end up triggering the KNOX. In this situation Universal Root De La Vega comes as an ideal solution.
This tool was created by Designgears and Chainfire, especially for all the users of Galaxy Note 3 at AT&T, Sprint or Verizon and named after AT&T Mobility CEO, Ralph de la Vega. But you don’t have to imagine that it can be applied only for this model; Root de la Vega is trying to become the ideal tool for all Samsung handsets whose firmware is available in .tar /.tar.md5 format, so here we can remember all the Samsung Galaxy devices starting with the first Galaxy phone, GT-I5700 all the way to other current models, including Galaxy S4, S3, Note 3, Note 2 and more. But Universal Root De La Vega won’t work for any of those Exynos powered Samsung handsets. If you are the owner of GT-I9500, GT-I9300, GT_I9100 versions and so on, this tutorial isn’t for you, but you’ll just have to use the CF-Auto-Root tool.

In order to successfully root your device, before taking in further action, here we have some guidelines that you must take in consideration:
- Make sure to backup all your data (you can take backup of your contacts or messages as well) as the rooting may go wrong and you can lose important information;
- Disable your anti-virus program before running the tool; it often interrupts the root process by deleting some of the extracted files;
- Use only the original USB cable to connect your Samsung Galaxy handset to PC;
- It is safer to have both your Samsung phone and your computer charged over 60%;
- This procedure works exclusively on Windows PC and check to see if you have the proper driver installed on your Windows computer.
Then, you have to download the firmware you want to root, by simply accessing SamMobile’s Aamsung firmwares directory from here. If it is in .zip format, you have to unzip it and check once again to be sure that it is a .tar/tar.md5/.exe file.
Download the following files and save them on your computer:
- Download Universal RDLV script (v0.2) from here;
- Download Root de la Vega sdcard files from here;
- Download Odin v3.09 from here.
How to root your Galaxy S4, S3, Note 3, Note 2 and more by using the Universal Root De La Vega tool:
Part 1 – Create a modified firmware file
- Extract the Universal-RDLV.zip file to a new folder on your PC;
- Open a command prompt window by selecting “Open command window here” option from the context menu;
- Create a FULL modified firmware file by tapping the command ‘urdlv full C:\I9505XXUEMJ5_I9505OXAEMJ5_I9505XXUEMJ5_HOME.tar.md5’ in command prompt window and hitting ‘Enter‘;
- After “urdlv full”, you must insert the path to location of the firmware file saved on your PC;
- After you hit Enter, a new command window will show you progress of the file creation;
- The modified firmware file is created with ‘_VEGA’ added to the end of file name, I9505XXUEMJ5_I9505OXAEMJ5_I9505XXUEMJ5_HOME_VEGA.tar.md5. and saved under “Output” folder inside the folder where you have previously extracted the files.
Part 2 – Flash the modified firmware
- Extract the ‘odin3.09.zip‘ file and boot your device into Download Mode;
- Run the ‘Odin3 v3.09.exe‘ file that you have just extracted;
- Connect your Samsung handset to PC;
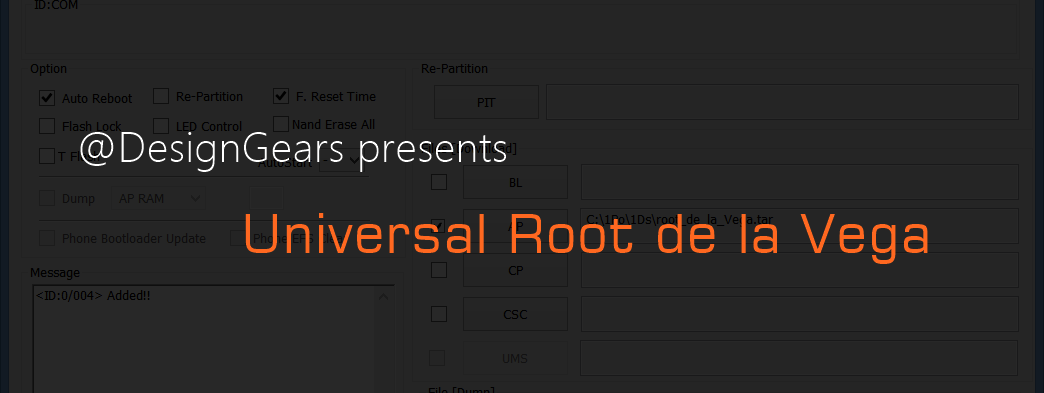
- Odin window will show you the Added!! message in bottom left box;
- Click on AP button in Odin and select the previously created firmware file;
- In the “Option” section of Odin, uncheck all the options excepting “Auto Reboot” and “F. Reset Time”;
- Click the ‘Start‘ button on Odin and wait until you see the ‘PASS!’ message which means that you Samsung device will restart automatically and that you have to disconnect it from PC.
Part 3 – Root your Samsung handset
- Extract the root_de_la_vega_sdcard.zip file;;
- Connect your phone to PC and Copy the file (root_de_la_vega.sh) and folder (root_files) to the root of internal SD card on your device;
- Restart the handset and delete the previous two files;
- Restart your handset again and the process is over.
So, Designgears and Chainfire have provided us exactly the tool that we needed the most for our Samsung Galaxy handsets, whenever CF-Auto-Root tool cannot be used and without losing the warranty too. But don’t forget to follow all these steps carefully. Otherwise, you might end up with a malfunctioning device and you are the only one responsible to what’s happening to it.

User forum
0 messages