Learn to Set Up Google Public DNS over TLS on Android Pie
2 min. read
Updated on

A Domain Name System is the component of your network connection that looks up the server IPs after you enter a domain name. We tend to use the default DNS services from the usual ISPs/carriers, but there are other options out there too, like Google Public DNS. And don’t forget that Google just revealed that its DNS service finally supports DNS-over-TLS, meaning it can be set as the system-wide DNS provider on your Android 9 Pie handset.
That’s why I am here for. Today I will show you how to set up Google Public DNS over TLS on Android Pie devices. If you are not sure about the advantages, then let me name just a few. With Google’s Public DNS, the DNS queries and their responses are carried over TLS encrypted connections, therefore improving both privacy and security between devices and their resolvers.
At the same time, you should know thatGoogle Public DNS supports TLS 1.3, which comes with its own major advantage. This reduces the response time during a DNS lookup and we all want faster web browsing. I am sure that you are not the exception to that, right? So, here’s what you have to do:
Learn to Set Up Google Public DNS over TLS on Android Pie:
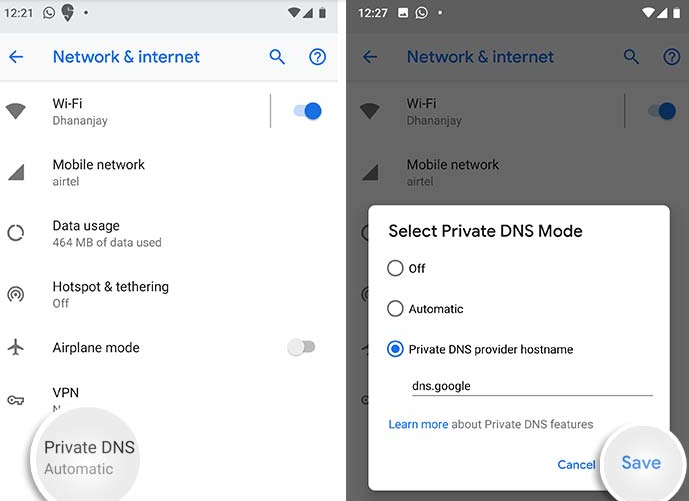
- First of all ,you must go to the Settings menu on your Android Pie device;
- Tap on Network & internet;
- Then, you have to hit Advanced;
- Press on the Private DNS option;
- Then, select Private DNS Provider hostname;
- Now you must enter ‘dns.google‘ into the given field;
- In the end, tap on ‘Save’ to set up Google Public DNS over TLS on your Android Pie device.
Be careful about somethingthough. The location of ‘Private DNS’ option in the Settings menu could vary from one handset to another, so do not be surprised.
Let’s take Samsung’s example. On its devices, it could be found under Settings > Connections > More connection settings. If you’re not able to find it on your device, then just search the Settings menu for Private DNS and this will solve the issue.


User forum
0 messages