
Turn Off Auto-App Update from Google Play Store
![]() 3 min. read
3 min. read
![]() Updated on
Updated on
Share this article

Improve this guide
We know that it is really convenient to have your Android smartphone / tablet automatically installing app updates as they become available, though the same operation might become quite annoying.
So, there are some good reasons for choosing to install apps manually: maybe you feel that it’s time to conserve your data plan usage, or maybe you want to keep tighter control over what gets installed on your Android device, not to mention all those cases when you see that Google Play is downloading updates of app after app after app and so on. This could be really annoying and stop you from other important activities!
And you don’t really need to us to tell you that there are so many cases when these updates simply slow down your phone or tablet and even if we must admit that it is highly recommended to update your apps, as developers work hard to improve them, accepting one update after another is not really a solution.
So, it really doesn’t matter the reason for this decision; if you are sure that this is what you want, then don’t hesitate to toggle this setting and gain more control over the app updating process. Here we are to guide on how to turn Off Auto-App Update from Google Play Store, so the auto-updating apps are no longer a problem.
How to Turn Off Auto-App Update from Google Play Store:
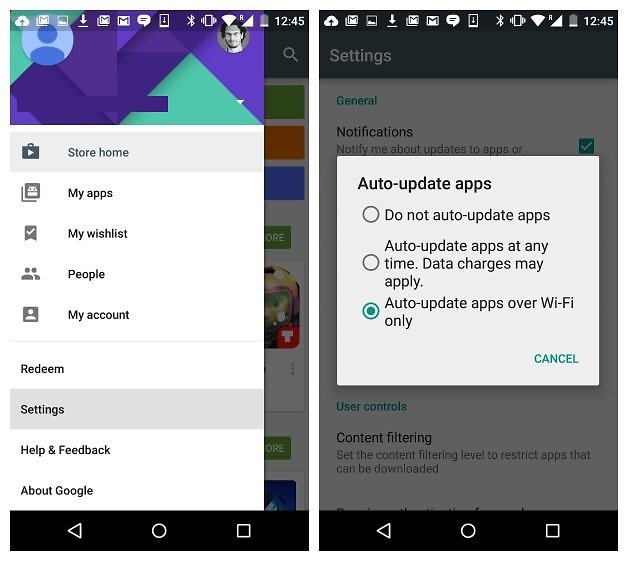
- Launch the Google Play Store app;
- After that, you must swipe out the navigation drawer on the left hand side, or use the ”hamburger” menu at the top left;
- Now, it’s time to choose settings;
- The “Auto-update apps” option an be found in the “General” section of the “Settings” screen. If it says “Auto-update apps at any time. Data charges may apply,” then your apps will be automatically updated;
- To turn this option off, touch “Auto-update apps;
- Then, on the “Auto-update apps” dialog box, touch “Do not auto-update apps”;
- Even in this case, you should continue receiving update notifications to alert you when an app needs updating though;
- The dialog box closes and the “Auto-update apps” option is updated with the “Do not auto-update apps” setting;
- All you have to do is to touch the Play Store icon in the upper-left corner of the screen to go back to the main Play Store screen;
- Don’t forget that if you still want your apps to update automatically, but you want to avoid going over your data limit, you have the possibility to touch the “Auto-update apps over Wi-Fi only” option. That option lets your apps to automatically update only when you are connected to a Wi-Fi network so you don’t use any data to do so.
And you should also learn how to manually update apps in the Play Store, just in case that you went with the first guide and enabled the Do not auto-update apps option:
- For the start, you must go to your list of apps, so swipe out the navigation drawer;
- Then, choose My Apps;
- You will see some sort of a list divided into two sections: either all of the installed apps on your phone currently or all apps you’ve ever downloaded from the Play Store;
- Apps that have updates available are listed at the top of the Installed tab, so feel free to choose to install them one at a time or all of them with the help of that Update All button at the top.
That was all!


User forum
0 messages