How to Install Android Nougat Beta ROM on your Galaxy S7
Samsung Galaxy S7 has not received any official Android Nougat update up to this point. However, the Korean company has started rolling out a new Nougat beta update to Galaxy S7 units that are participating in the company’s Galaxy beta program and even if at this point the update is only available in the UK and South Korea, that’s at least a start.
Make no confusion as this is not a major update; this time, there are no new features included. But there are some noticeable changes that it brings along, including a fix for the intermittent rebooting issue, as well as transparency for notifications on the lockscreen. And at least we know for sure that Samsung is closer than ever to the final release of its Android 7.0 Nougat update for Galaxy S7 handsets.
Is your location a problem that stops you from enjoying the update? It should not be as long as you still can install the Android Nougat Beta firmware and can enjoy the new and amazing features on your Galaxy S7.
This tutorial can only be applied on Galaxy S7 models with the model numbers G930F and to make sure that your data is out of any danger, don’t hesitate to make a complete backup of all your important files. The TWRP recovery has to be installed on your Galaxy S7, just as the bootloader of your Galaxy S7 must be unlocked.
And as I always tell you: don’t you even think of starting the procedure without verifying the battery percentage of your handset. If it is under 60%, plug in the charger or you simply risk bricking your Galaxy S7 and you are the only one to be blamed. I am sure that this is not what you have in mind, therefore act responsible!
If your smartphone is running on any other version of Nougat ROM, then this guide is for you:
How to Install Android Nougat Beta ROM on Galaxy S7 (method 1):
- Download the custom ROM from here;
- Then, take the Android 7.1 Gapps package and transfer it to the internal storage of your device;
- Power off your device and wait until it’s completely turned off;
- Up next, press and hold Power + Home + Volume Up buttons together and release them when you see the Galaxy logo on the screen;
- As you’re in the TWRP recovery, make a complete Nandroid backup of your handset;
- Now, complete a factory reset and also wipe the Dalvik cache;
- It’s time to flash the custom ROM, so select the Install option from the recovery menu;
- Up next, select the ROM zip from the file manager;
- You can now flash the OpenGapps package that you’ve downloaded;
- Reboot the device.
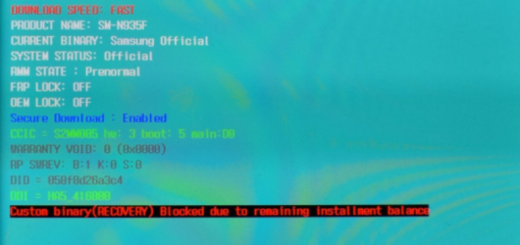
If you are coming from Marshmallow ROM, you have to flash the bootloader and modem with the help of Odin. After that, you have to flash the ROM using the TWRP method.
How to Install Android Nougat Beta ROM on Galaxy S7 (method 2):
- Download the latest version of the Odin and your mobile driver from here;
- Download the bootloader and model file by using this link;
- Also take ODIN in your computer from here;
- Boot your mobile into download mode, by pressing the Volume down, Home, as well as Power buttons;
- Once you reach the download mode warning screen, tap the Volume up button;
- Open ODIN;
- Connect your phone and wait until you get blue screen in ODIN;
- Place the BL file in BL Section;
- Place the CP file in CP Section;
- Make sure that Auto Reboot, Re-Partition and F. reset time are unmarked;
- Up next, tap on Start;
- Once you see the success message, feel free to reboot your mobile;
- Then, do not hesitate to follow the above TWRP method in order to install the Nougat 7 Firmware.