
Install Android M on Sony Xperia Z Ultra using FreeXperia ROM
Sony Xperia Z Ultra is one of the few devices on which you can easily enjoy the all new Android M Developer preview. If you are the owner of this device, why missing such a chance? The FreeXperia custom ROM community took good care of you and here I am to guide you on how to install Android M on Sony Xperia Z Ultra by using FreeXperia ROM.
Here I am to tell you from the start the fact that this tutorial is only to install the Android M Developer Preview ROM build provided by FreeXperia for Sony Xperia Z Ultra, so don’t even think of trying it on any other device. You should also be aware of the fact that there are some bugs that might annoy you, while the final build will be much more stable and may come with even more features. And just as it always happens, you should know the fact that this operation is not official, so it will make you lose the warranty of your handset (use this guide on How to restore it). However, this also means that if something wrong happens, you will be by yourselves, so make no mistake.
Before starting, you must make a backup of all the important data, additional files, apps and settings as this procedure will wipe all the data. Make sure that the device is rooted, with the latest TWRP already installed and that the bootloader is unlocked. Even more, your Sony Xperia Z Ultra must have at least 60 percent of battery charge in order to avoid the unpleasant surprise of seeing it powering off during the installation process.
Make sure the USB drivers of this handset have been installed on the PC and also prepare the original USB cord to establish the connection. Are you ready for the procedure? Let’s begin:
How to Install Android M on Sony Xperia Z Ultra using FreeXperia ROM:
- Download Android M Developer Preview Build ROM by FreeXperia Download with the help of this link;
- Also take GApps from here;
- Connect the device to the computer using USB cable;
- Transfer the downloaded files to the SD card root;
- Now, you have to turn off the Sony Xperia Z Ultra device and disconnect from the PC;
- Boot it into recovery mode;
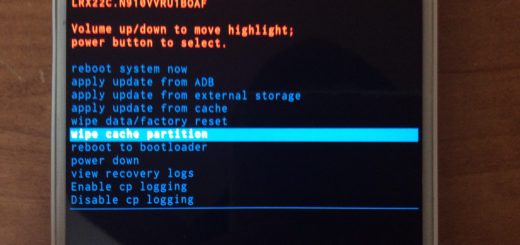
- Perform full data wipe by selecting ‘wipe data/factory reset’ option in the recovery mode;
- Use the Volume keys to navigate and Power button to select, while operating in the recovery mode;
- You must also clear cache memory of by selecting ‘wipe cache partition’;
- Return to main menu of recovery mode and select ‘advance’;
- After that, choose ‘wipe dalvik cache’ to perform a complete wipe;
- Then, go back to the main menu of the recovery mode and select ‘install zip from SD card’;
- Navigate to the SD card in order to select the ROM zip file, which you copied before;
- Do the same for the Google Apps;
- Then, you have to go back to main menu of recovery mode;
- Reboot the device by selecting ‘reboot system now’.
Wait until the device starts. Now your Sony Xperia Z smartphone should be running the Android M ROM by FreeXperia.


If this is for the Ultra why is named ‘amani’, which is the Xperia Z1 Compact!!???