
Smartly Use S Finder on Samsung Galaxy S6
![]() 4 min. read
4 min. read
![]() Updated on
Updated on
Share this article

Improve this guide
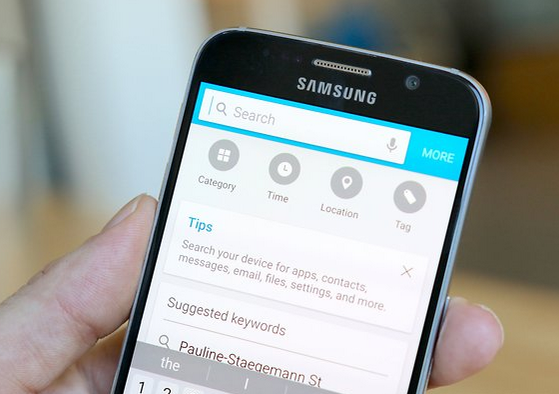
When it comes to premium smartphones, Galaxy S6 is an ideal example. If you own it, then you know of what I am talking about. However, as your S6 fills up, it can become more difficult than ever to find what you want, when you want it, so it’s time to take action and find a solution as soon as possible. Samsung’s response to this increasing demand is none other than S Finder, which you’ll find in the notification panel at the bottom left.
All you have to do is to swipe down from the top of the screen, tap S Finder, and type in your search. It covers all your files, apps, photos and contacts, but it can also search for settings. In fact, this is the major advantage that you should know about from the start: S Finder makes it easier than ever before to search for a wide variety of content on your Galaxy S6 device in just a few seconds.
For example, you could enter “wallpaper” and then quickly access the Wallpaper Settings page from the search results. That’s how simple is to find what you are truly looking for, so carefully follow the steps from below and you’ll succeed:
How to Use S Finder on your Galaxy S6 Device:
- Open the Notification Panel by swiping your finger from the top of the screen to the bottom; like that, you can always access the S finder option;
- Up next, just touch S Finder;
- Enter a keyword in the Search box to begin searching whatever you might be looking for: as pictures, files, contacts, settings and more;
- Using your voice and not the keyboard is another option for that;
- Then, do not hesitate to touch Filter Results Icon to select filters such as date, locations, content type and content tags in order to narrow your search results;
- Do not hesitate to touch More options > Settings for the following options:
- Results display order: choose from the following options: Frequently used category first, Currently used category first, Alphabetical, as well as Custom;
- Select search category: by default all categories are included in the search, but it is only up to you to unmark the checkbox to exclude the category;
- Save search history: place a check mark next to this feature if you want to turn it on, so starting to this moment, a history of your search entries will display in a list under the Search box.
- Delete history: do you have something to hide? It’s your phone, so do what you want with it in order to feel safe and keep sensitive into away from curious eyes. All you have to do is to select results from your search history to delete;
- Select filters: by default all filter types are selected, but don’t forget that you can unmark the checkbox to exclude the filter in future searches.
As you can see, this is a lot faster than digging around.
Thanks for reading and do not hesitate to check the other tutorials that we have for you! More guides about Samsung’s amazing Galaxy S6 handset can be found in the How to section:
- How to Access and Change Galaxy S6 Sound Mode;
- How to Change Samsung Galaxy S6 Themes,
- How to Customize Samsung Galaxy S6 Ringtone;
- Learn How to Manually Close Apps on Galaxy S6 from here;
- How to Move Data from Old Devices to Galaxy S6 through PC;
- How to Use Samsung Smart Switch on Galaxy S6, How to take Galaxy S6 Screenshot;
- Do you know how to Stop and remove Android Text Message Virus (Stagefright) on Galaxy S6? This guide will help you with that;
- Easily Solve Galaxy S6 Notification Toggles Disappearing Issue;
- Easily Create App Folders in Galaxy’s S6 Home Screen and more.


User forum
0 messages