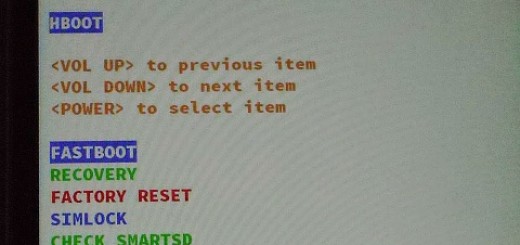
How to Install TWRP 3.0.0 on Android Phones with Flashify
The team behind TWRP has finally released version 3.0.0 of the most popular custom recovery for Android devices, so it’s time for a change. The TWRP custom recovery is an extremely useful tool that helps us execute tasks like rooting, flashing custom roms, flashing Xposed Installer, flashing mods and many more and now, that we have a new version, you can only imagine that you will receive even more.
The latest version of the recovery was 2.8.2 before being replaced with version 3.0.0 which comes with various goodies. For example, you will see from the start a beautiful material like design which is flat and looks much better than the old-school TWRP theme. But don’t you imagine that this change in the GUI is the only one waiting for you!
On the contrary, the team has also included a variety of useful features such as true terminal emulator, language translation, flashing of image files and many more bug fixes, not to mention the new support for adopted storage on a few devices and that the AOSP base has been updated to Android 6.0 Marshmallow. The list goes on with more and more changes, but the best part is that TWRP 3.0.0.0 is available for all supported devices. Some of the most popular devices include Galaxy S3, S4, S5, S6, Note 2, Note 3, Note 4, Note 5, as well as HTC One, M8, M9, Nexus 5, Nexus 6, Nexus 5X and 6P, numerous LG flagships and not only.
I bet that your device is on the list as well, but remember that Installing TWRP 3.0.0 via Flashify needs your phone to be rooted. Isn’t this a problem? Installation of TWRP 3.0.0 on your Android device is pretty easy, so don’t hesitate to follow the below guide:
How to Install TWRP 3.0.0 on Android Phones with Flashify:
- First of all, you have to download and install Flashify from play store or by entering directly here;
- Up next, download the TWRP 3.0.0 image file from here;
- You must select the recommended image for your device;
- It’s time to open flashify;
- Note that it will ask for SuperSu permission, so grant it;
- Go to the main page click on recovery image and choose recovery.img file or twrp.img file;
- All you have to do is to click OK to flash TWRP 3.0.0 recovery on your device.
That wall the entire procedure! If you find this guide as being useful, kindly share it with others using the share buttons.
Also read: How to Install TWRP 3.0.0 Custom Recovery on Android Phones via Fastboot