Enable USB Debugging on your very own Sony Xperia Phone

One fact that we all know about the developer options on Android smartphones is that they are hidden by default. Things have not always been like that. Many of the features inside the developer options are only for those who have development knowledge about Android apps and software. And if you like to explore, I may only assume that you’re past that and Developer options menu will remain in your device, at least unless you do a factory reset.
So, you are ready to enable USB Debugging on your very own Sony Xperia Phone? You may have seen this name before and wondered whether you should enable it or not. Let’s take a look at what this mode is for and whether you need it. Android’s USB debugging feature may sound a bit scary but it’s not as complex as it may first seem. USB debugging is basically just a way to allow your Sony Xperia smartphone to transfer information to and from a computer. USB Debugging is required by adb, which is later used in so many ways.
I am talking about rooting, backing up, installing custom ROMs, tacking screenshots from computer, fixing your bricked phone and more.
Note: To enable USB debugging, you first must enable the Developer options menu in Android. Do that now if you haven’t already done it. Also remember that the ways to enable USB Debugging mode slightly vary from one Android OS version to another.
Enable USB Debugging on your very own Sony Xperia Phone:
- From your Home screen, you have to go to Settings;
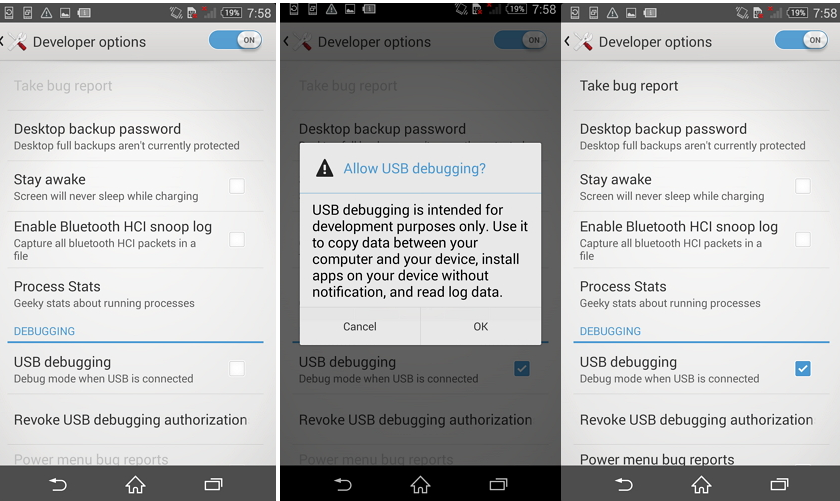
- Assuming that you are already a developer, you will see the Developer options menu there. So, you just have to select Developer options;
- Slide the “USB debugging” option to On and you’re ready to use your device with developer tools;
- Next time you connect your Sony Xperia device to computer using a USB cable, you will see a messages “Allow USB Debugging” for allowing a connection. Just tap OK and continue your job.


User forum
0 messages