Learn to Add Crossfade Transitions to Video Projects
We all have plenty of photos and videos to remind us of all those amazing events in our lives: graduation, wedding, birthdays and holidays, and so on. Instead of letting your footage gather dust in a lost drawer and forgetting all about it, why not enjoying Premiere Clip for getting the best results?
This comes as a free Android video editor that makes it simple to create quality videos that can be easily shared or easily opened in Adobe Premiere Pro CC for extra polish.
However, not many of you know the fact that Adobe Premiere Clip has a crossfade tool built in that waits to be used. During a crossfade, also known as a dissolve in filmmaking, the effect overlaps both the end of one clip and the beginning of another, dissolving one clip into the other seamlessly. Just like a fade in or fade out, crossfades are the ideal sign for indicating that time has passed between two scenes, but they can also be used for other purposes.
Don’t you know how to add Crossfade Transitions to Video Projects? Check the below steps for inspiration, and then start creating your own masterpiece using our instructions! And keep in mind the fact that you must be in the freeform editor in order to enjoy this feature.
Learn to Add Crossfade Transitions to Video Projects:
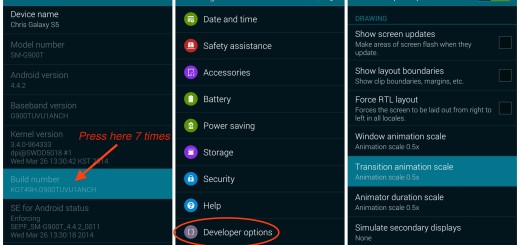
- First of all, you must tap the gear icon at the top of the display to open your project’s Settings;
- After that, you should toggle on “Crossfade between clips”;
- At this point, Premiere Clip will automatically apply the crossfade effect to all of the clips in your project.
Some complain about the fact that there is no chance to specify which clips they would want to have crossfades for and which they wouldn’t. This is indeed a major drawback, yet this will create a nice effect for your entire project, so I see no reason for nor trying it out too.